


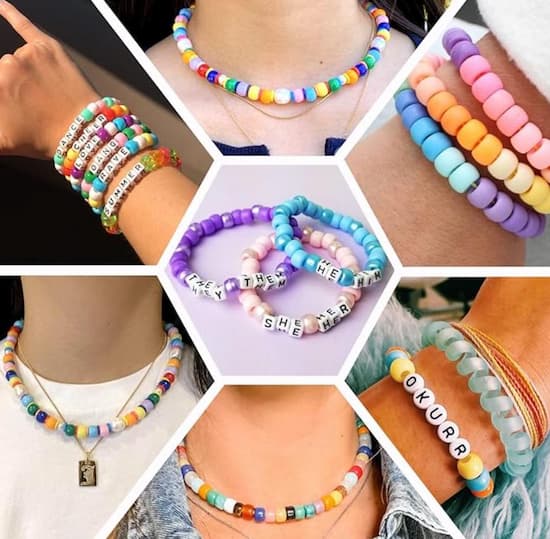
As a popular handmade craft, beaded bracelets are a timeless classic. It elevates the style of the wearer, and it takes minimal effort to make. But how to make beaded bracelets at home? What are the materials and steps needed?
If these questions still occupy your mind, now is the time for a solution. In this blog, we’ll dive into the world of how to make bracelets with beads, unraveling the materials, steps, personalization ideas, and some advanced techniques. Whether you're a beginner or a seasoned crafter, this guide on how to make a bead bracelet will inspire you to unleash your imagination and craft bracelets that are as individual as you are. Let's get started!

When it comes to making bead bracelets, selecting the right materials is essential for achieving the desired look and durability. Here's a breakdown of the key components of how to make a beaded bracelet:
Beads: The heart of any beaded bracelet, beads come in a dazzling array of shapes, sizes, colors, and materials. From classic glass beads to semi-precious gemstones, choose beads that resonate with your style and aesthetic.
Stringing Material: The string or wire you choose will determine the strength and flexibility of your bracelet. Options include elastic cord for easy stretch bracelets, sturdy nylon thread for traditional stringing, or wire for more intricate designs.
Jewelry Glue: For securing the knot once it’s tied.
Crimp Covers: For hiding the knot and achieving a professional finish.
Tools: The essential tools we use for how to make bracelets with beads and string include scissors and flat-nose pliers. These tools will help you cut and secure your materials with precision.
Now that you've gathered your materials, it's time to dive into the exciting process of how to make bracelets from beads. Follow these how to make bead bracelets instructions to create beautiful bracelets that reflect your personal style:
The first step of how to make bracelets using beads is design planning. Before you start cutting cords and stringing beads, take a moment to envision the design of your bracelet. Consider the color scheme, pattern, and overall aesthetic you want to achieve. Sketching out your design or laying out your beads can help you visualize the final product.
Set up a clean, well-lit workspace with all your materials and tools within reach. Clear any clutter to avoid distractions and ensure you have ample space to work comfortably.
You would want the size of your bracelet to fit your wrist. Begin by wrapping the cord around your wrist. When wrapping, make sure the cord fits snugly but not too tightly. Mark the point where the string meets, and add some extra length (typically a couple of inches) for both increased comfort and an easier time tying knots. With your measurement in hand, carefully cut the cord.
Now, string your beads onto the cord in the desired pattern or arrangement. Take your time and pay attention to spacing to create a balanced look.
Once the beads are strung onto the cord, you need to tie the knot to prevent the beads from sliding off. There are lots of knot types with varying strengths. For our project at hand, a surgeon’s knot is a good choice, as it is both strong and not a handful to make. Once you have finished tying the knot, apply a bit of jewelry glue to the knot for added security. Now, it is nigh impossible for the knot to come undone.
Once you've securely fastened the ends of your bracelet, it's time to conceal the knot for a polished and professional finish. Here are two effective methods to hide the knot:
Hiding in Adjacent Beads: For bracelets made with larger beads, you can hide the knot by threading the ends of the cord back through several adjacent beads. Use a needle or beading awl to guide the cord through the beads, ensuring that the knot is nestled snugly inside. This method not only conceals the knot but also creates a seamless appearance.
Using Crimp Covers: This is the more universal approach in bead bracelet making. After securing the ends of your bracelet, simply slide a crimp cover over the knot and gently squeeze it shut using flat-nose pliers. The crimp cover will effectively camouflage the knot, giving your bracelet a professional appearance.
With the bulk of the process of how to make cool bracelets with beads now complete, what remains is to apply the finishing touch. Simply trim away the excess cord on the knot using a pair of scissors. Remember to trim at a position as close as possible to the crimp cover. And congratulations, your DIY bracelet is done!
While the steps of how to make bead bracelets with wire are laid out in full, personalizing your beaded bracelets is where the magic truly happens. Here are some inspiring ways of how to make cute bead bracelets that reflect your unique style:
Choose Meaningful Beads: Select beads that hold significance to you. Whether they represent birthstones, favorite colors, or symbols with personal meaning, incorporating these beads adds depth and sentiment to your design.
Mix and Match: When trying out how to start a beaded bracelet, get creative with bead combinations. Experiment with different sizes, shapes, textures, and materials to create visually dynamic bracelets that reflect your eclectic style.
Add Charms and Pendants: Enhance your bracelets with charms and pendants that resonate with you. From whimsical shapes to meaningful symbols, these embellishments add personality and flair to your creations.
Customize with Initials or Names: Incorporate alphabet beads or engraved charms to spell out initials, names, or meaningful words. This personalized touch makes your bracelet truly one-of-a-kind and can be a heartfelt gift for loved ones.
Create Matching Sets: Extend your personalization to create matching sets of bracelets, necklaces, or earrings. Coordinating pieces add cohesion to your jewelry collection and make for stylish accessory combinations.
For dedicated bracelet enthusiasts seeking to elevate their craft beyond our instruction of how to make bracelets with beads step by step, a world of advanced techniques awaits. Here are some advanced techniques for them to explore:
Bead Weaving: Delve into the art of bead weaving, where individual beads are woven together using various stitches to create intricate patterns and designs. Explore stitches like peyote stitch, herringbone stitch, and right-angle weave to craft bracelets with stunning texture and detail.
Wire Wrapping: Learn the art of wire wrapping to create custom charms, links, and focal points for your bracelets. Master techniques like coiling, looping, and weaving wire to add dimension and flair to your designs. Wire-wrapped elements can complement beaded components or stand alone as focal points in your bracelets.
Macramé: Dive into the art of macramé knotting to create bracelets with intricate patterns and textures. Experiment with various knotting techniques like square knots, half-hitch knots, and spiral knots to create stylish and adjustable bracelets.
Kumihimo Braiding: Explore the ancient Japanese art of Kumihimo braiding to create bracelets with intricate cord patterns and textures. Use a Kumihimo disk or marudai to weave together multiple strands of cord or ribbon, incorporating beads for added embellishment.
Congratulations, you're now armed with all the information you need to embark on your first DIY beaded bracelet project. From essential supplies to advanced techniques, we've provided you with a comprehensive beaded bracelet tutorial to get started. By following our step-by-step instructions on how to make beaded bracelets, you're just moments away from crafting a bracelet that not only complements your outward style but also mirrors your inner essence. So, shop your Quefe Beads for Bracelet Making Kit, set up your workspace, and happy crafting!
The number of beads needed to make a bracelet depends on several factors, including the desired length of the bracelet, the size of the beads, and the chosen design. On average, a simple beaded bracelet measuring 7 inches may require approximately 25 to 30 beads.
To create homemade bead bracelets that are both stretchy and durable, consider the following tips:
Use high-quality elastic cords designed for jewelry making, such as stretch magic or elastic stretch cords.
Choose a cord with multiple strands for added strength and resilience.
String the beads onto the cord without overstretching, leaving some slack for natural movement.
Reinforce the knot with jewelry glue for extra security.
A well-fitting beaded bracelet should be snug enough to stay in place on your wrist without being too tight or restrictive. It should comfortably slide over your hand when putting it on or taking it off, without feeling too loose or falling off easily.

Learn our curated cute bead bracelet ideas & craft your personalized bracelet masterpiece. We also cover detailed guidance for making your own bracelets.
Read More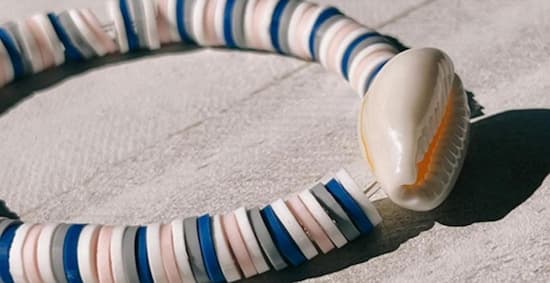
Check out our flat clay bead bracelet ideas & DIY bead bracelets at home. Decorate your wrist & express your sentiments with our ideas for clay bead bracelets.
Read More