


If you're looking to add a touch of personal flair to your accessories collection, learning how to make a gimp bracelet is a fun and creative way to do it. This article is the perfect guide for beginners, providing a step-by-step overview of the process, including the essential materials and tools required to get started. For those who are more experienced in gimp bracelet making, we've also included advanced techniques and patterns to help you take your designs to the next level. Get ready to unleash your creativity and make some beautiful bracelets!
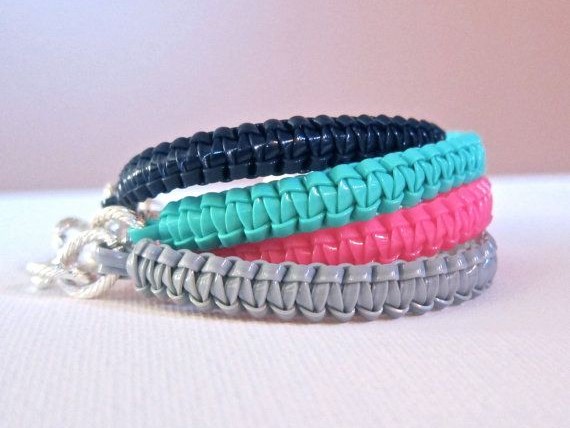
Gimp bracelets, also known as boondoggle or scoubidou, are colorful, handmade accessories often created by twisting, knotting, or weaving plastic lacing (gimp). A popular craft among children and teenagers, these bracelets offer a simple and fun channel for creativity and personal expression. Varieties of braids range from simple two-strand designs to more complex box or spiral patterns, offering creative freedom to individuals who wish to make unique pieces. In addition to their aesthetic appeal, gimp bracelets help enhance fine motor skills, problem-solving abilities, and patience, making them not only a creative pastime, but also a beneficial developmental tool.
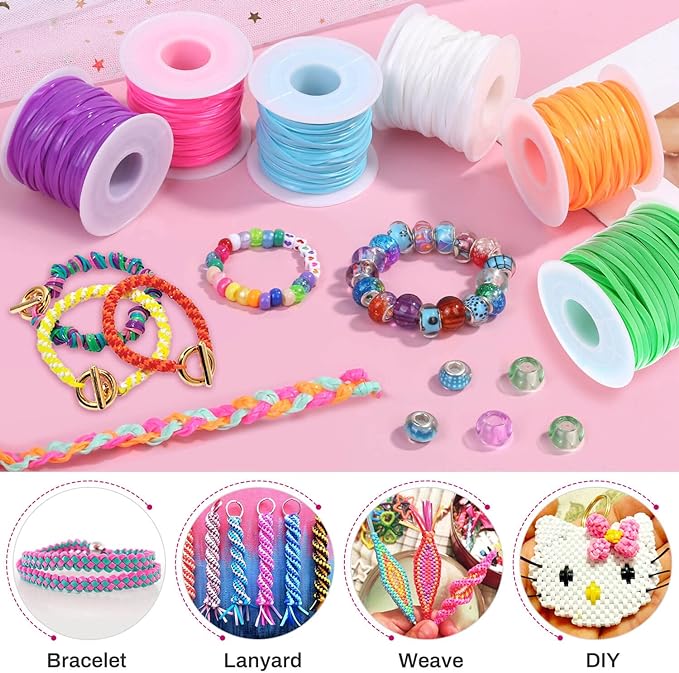
Before you start your journey on how to make a bracelet with gimp, you'll need some tools and materials to get started.
Here's a list of the required items:
If you are a beginner gimp bracelet making, take a look at the Cridoz Lanyard String Kit! This kit features six packs of vibrant, plastic lacing cords, bursting with color to inspire creativity and fun. The cords are made from high-quality, eco-friendly PVC plastic that is non-toxic and odorless, so they're safe for crafters of all ages. They're also soft, durable, and have a smooth, shiny texture that makes them easy and enjoyable to work with. Each roll is 20 yards long and has a flat shape that's just the right size for weaving. Whether you're making bracelets, keychains, or other crafts, this kit is a great way to explore the art of gimp bracelets and revisit childhood memories.
Now, let's go through how to make a gimp bracelet step by step. Here are the two most common methods of making gimp bracelets:
Let's start with the simple and popular square stitch gimp bracelet. Here's how to make a gimp bracelet with two strings:
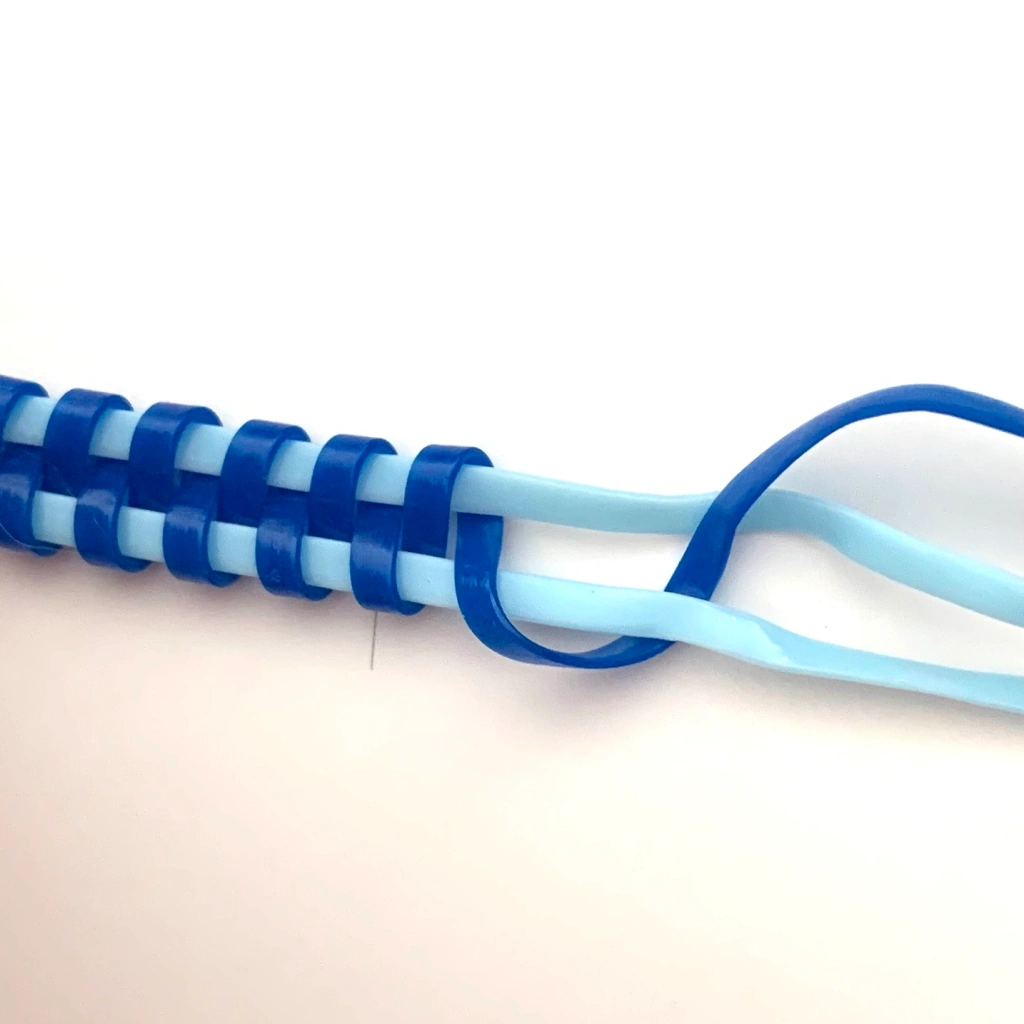
Step 1: Measure and cut your gimp. For a square stitch bracelet, you'll need two pieces of gimp. One piece should be approximately one foot long, and the other piece should be roughly twice the length of your wrist's circumference.
Step 2: Find the centers of each strand. Hold the shorter strand horizontally, then lay the longer strand vertically over it, aligning their centers to form a '+'.
Step 3: Begin your square stitch. First, fold the top down and the bottom up of the longer over the shorter. Then fold the left end of the shorter strand to the right over the longer, and the right end to the left over the longer.
Step 4: Pull all ends slowly until a knot forms at the center. This forms the initial square stitch.
Step 5: Continue the square stitch. Maintain the ends' orientation, and fold the top down and the bottom up of the previous bottom strand (which is the longer). Again, fold the left to the right and right to the left for the other strand.
Step 6: Keeping straight orientation, pull the strands slowly until a new knot forms below the first one.
Step 7: Repeat steps 5 & 6 until the bracelet reaches your desired length.
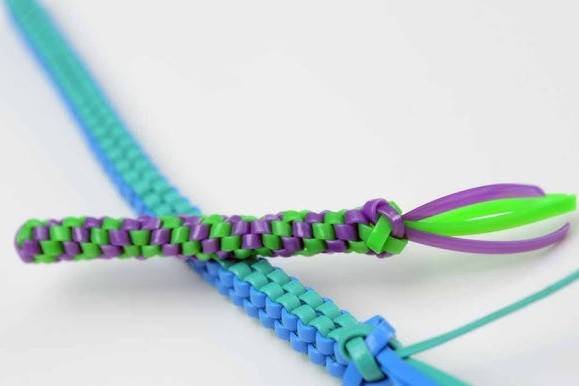
Step 8: The last step on how to make a box gimp bracelet is to secure the bracelet. After reaching your desired length, make a final tight stitch, then cut the remaining strands while leaving at least half an inch. Melt the ends with a candle/lighter to prevent fraying if your gimp is made from plastic. Make sure to be safe when doing this.
The Zipper Stitch is the second simple gimp stitches, and it's a great starting point for beginners. Its name comes from its appearance, which resembles the teeth of a zipper.
Step 1: Start the process of how to make a bracelet out of gimp (zipper stitch) by cutting two separate gimp strands of equal length. Cross the strands over each other to form an X-shape.
Step 2: Fold the top strand over the bottom, and then the bottom over the top.
Step 3: Repeat these steps, always making sure to fold over in the same order until you reach the desired length of your bracelet.
Step 4: To finish, simply switch the order you fold for one iteration, and then tie a knot to secure the end.
Here are some more intricate techniques and bracelet patterns for those who have mastered the basics:
1. Spiral Stitch: This involves a variation of the basic loop and weave, but by consistently looping one color over another in the same order, you create an appealing spiral effect. Important to keep tension even to maintain a consistent spiral.
2. Diamond Braid: A more complex version of the box stitch. Instead of crossing strands in a plus sign, you cross them diagonally to create an “X”, working the strands through in a similar over-under pattern but resulting in a more intricate diamond pattern.
3. Circle Stitch: Employing two gimp strands folded in half, you loop each one around the others to create a circular shape. This pattern requires maintaining even tension on all strands to ensure a neat and uniform circle.
4. Triangle Stitch: This stitch involves using three strands of gimp instead of two. You'll weave them together in a pattern that creates a firm triangle shape with a hollow center. It’s a challenging stitch because keeping the shape requires precise tension control.
5. Butterfly Stitch: This delicate and elaborate stitch resembles the wings of a butterfly. It's based on looping strands around each other in a specific way to create “wings” on the sides of the stitch. You must pay close attention to the order of the loops and tension to ensure symmetry.
6. Brick Stitch: Similar to the square stitch, but by altering the order in which you weave the gimp, you can create a pattern that resembles a series of bricks. This stitch is built upon layer by layer and requires maintaining a checkerboard tension.
To conclude, mastering how to make a gimp bracelet elevates a casual pastime into an exciting creative journey. By embracing new techniques and designs, there's no limit to the variety and complexity of bracelets you can produce. Not only do these pieces offer an avenue for artistic expression, but they also serve as unique, meaningful gifts. So, let your imagination run wild and push your crafting skills to new heights with gimp bracelets!
Here are some commonly asked questions on how to make a gimp bracelet.
For gimp (also known as lanyard or boondoggle) bracelets, the length of gimp required can vary, but a good general rule is to use about a yard (3 feet or approximately 90cm) of gimp for every inch (2.5cm) of the completed bracelet. However, consider the specific pattern or thickness you plan to make, which could require more.
To make your gimp bracelet more durable, ensure you're using high-quality gimp material to start with, and pull your knots tight as you work to create a stable, well-structured bracelet. Additionally, you might apply a small amount of clear nail polish or a craft sealant at the ends to prevent fraying, being careful not to stiffen the bracelet too much.
The short answer is YES. For typical dirt and grime, gently hand wash them with mild soap and warm water, then let them air dry completely before wearing them again. Avoid harsh chemicals or scrubbing too vigorously as this may damage the material or cause the colors to fade.
To make a gimp bracelet with 3 strands, start by knotting the strands together at one end. Braid the strands by alternately crossing the left and right strands over the center one. Continue this pattern until desired length, then knot the end to secure. Trim excess for a neat finish.
Step into crafting elegance with our guide on how to make a cufflink bracelet. Transform, customize, and add a personal touch to your style.
Read More
Get quick tips on how to remove festival bracelet without damage! Understand different types & locking methods for easy, hassle-free removal.
Read More
Get a step-by-step guide on how to measure pandora bracelet! Learn new tips, measure with ease and add charms with confidence for a snug, comfy fit.
Read More
Master how to resize a bracelet with our guide on measuring your wrist, understanding when to adjust, and tips for different bracelet types.
Read More