


Kumihimo, a traditional Japanese braiding technique, has gained popularity for its ability to create stunning and intricate bracelets. If you're eager to delve into the world of crafting and want to fashion your own unique Kumihimo bracelet, you're in the right place.
This step-by-step guide will take you through the process on how to make a kumihimo bracelet, from understanding what is it, to gathering materials and crafting a beautiful bracelet.
Kumihimo bracelets are a type of handwoven jewelry that originated in Japan. The word "Kumihimo" itself means "gathered threads" in Japanese. These bracelets are created using a braiding technique that interlaces strands of thread, yarn, or even beads to form a beautifully patterned and textured design. The technique allows for a wide variety of patterns and color combinations, making each Kumihimo bracelet a unique and personalized piece of art.
Before you start learning how to make a beaded kumihimo bracelet, it is essential to gather all the necessary materials. Here's a list to get you started:
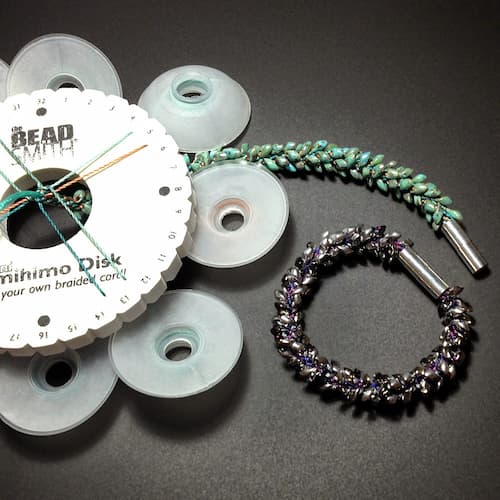
1.Kumihimo Disc or Loom: This is a round or square foam disc with notches along the edges to hold the threads in place while braiding.
2.Threads or Yarn: Choose a selection of threads or yarn in your preferred colors. Silk, nylon, or satin threads work well for traditional Kumihimo bracelets.
3.Beads (Optional): If you want to add a touch of sparkle or color to your bracelet, consider incorporating beads into your design.
4.Scissors: For cutting the threads or yarn to the desired length.
5.Glue: A small amount of glue to secure the ends of your finished bracelet.
6.Clasps and Jump Rings: These will be used to fasten your bracelet once it's complete.
7.Weight (Optional): A small weight to attach to the end of your threads to provide tension while braiding.
Now that you have your materials ready, let's move on to the step-by-step guide on making a Kumihimo bracelet.
Here are the simple yet easy steps on how to make kumihimo bracelet:
Step 1: Set Up Your Kumihimo Disc
Place your Kumihimo disc on a flat surface, and if needed, secure it with a weight or clamp. If you're a beginner, start with an eight-strand braid for simplicity. Insert your threads into the notches on the disc, ensuring an even distribution of colors.
Step 2: Arrange Your Threads
Arrange your threads in the desired order. Experiment with different color combinations and patterns to achieve the look you want for your bracelet.
Step 3: Start Braiding
Following the pattern you've chosen, begin the braiding process. Cross the threads over the disc, moving in a clockwise or counterclockwise direction. As you braid, the Kumihimo pattern will emerge.
Step 4: Add Beads (Optional)
If you've chosen to incorporate beads into your design, thread them onto the appropriate strands during the braiding process. This will create a beaded Kumihimo pattern.
Step 5: Continue Braiding
Continue the braiding process until your Kumihimo bracelet reaches the desired length. Remember to keep the tension consistent for an even and polished result.
Step 6: Finish and Secure
Once you've reached your desired length, remove the threads from the notches and secure the ends with a temporary knot. Apply a small amount of glue to the ends to prevent unraveling.
Step 7: Attach Clasps
Attach your chosen clasps and jump rings to each end of the bracelet to complete the piece. Your Kumihimo bracelet is now ready to be worn and showcased.
The time it takes to make a Kumihimo bracelet can vary depending on several factors, including the complexity of the pattern, the thickness of the cords, and the skill level of the person making the bracelet. Generally, a simple Kumihimo bracelet with a basic pattern and using thin cords might take about 1 to 2 hours to complete for someone with some experience.
While creating a Kumihimo bracelet can be a rewarding endeavor, it can also be time-intensive, particularly for intricate designs. If you're looking to enjoy the beauty of this traditional Japanese craft without the wait, consider the "KYOTO ASAHIYA Kumihimo Bracelet." Made entirely of silk and crafted in Japan, this exquisite piece measures 36 cm in length and showcases the art of Kumihimo—'gathered threads'—in a ready-to-wear format that promises to impress on any occasion.
You may now construct a gorgeous collection of this handcrafted accessory by experimenting with different patterns, colors, and bead combinations once you've mastered how to make a kumihimo bracelet.
Because of the boundless innovation possible with this ageless art form, every bracelet is a distinctive representation of your individual style. Whether for personal enjoyment or as a handmade gift, these intricately woven bracelets offer a touch of elegance and a deep connection to a centuries-old craft.
For a Kumihimo bracelet, the length of each string should generally be about three times the finished bracelet length. Typically, you'll need strings about 21 to 28 inches long for a standard bracelet. However, it's wise to add a few extra inches to account for the braiding process.
The number of beads needed for a Kumihimo bead bracelet depends on the design and length. Typically, for a bracelet about 7 inches long, you might use anywhere from 8 to 10 beads, allowing for some variation based on bead size and desired thickness.
To make a standard 7-inch bracelet, you’ll typically use 8 strands, each strand should be approximately 21 to 28 inches long.

Learn how to make a kandi bracelet with our ultimate guide covering history, culture, materials, and a step-by-step tutorial for crafting your own.
Read More
Wondering how to make a kabbalah bracelet? Learn step-by-step techniques with our comprehensive guide for crafting unique spiritual accessories.
Read More
Discover the art of how to make a hair tie bracelet with our step-by-step guide. Learn how to make stylish accessories effortlessly at home.
Read More
Get the gist of how to make pony bead bracelets in a few simple steps. Learn the essential bead bracelet making steps & effective maintenance tips with us.
Read More