


Have you ever envied that eye-catching pony bead bracelet adorning your friend’s wrist? If so, you probably want to craft your own bracelet and showcase your unique style like others do. But how can you DIY your own pony bracelet? In this blog, we dive into the step-by-step process of crafting your own pony bead bracelet. From essential pony bead bracelet ideas to the intricate making process, our instructions cover every detail. Join us as we embark on a journey of creativity and self-fulfillment now!
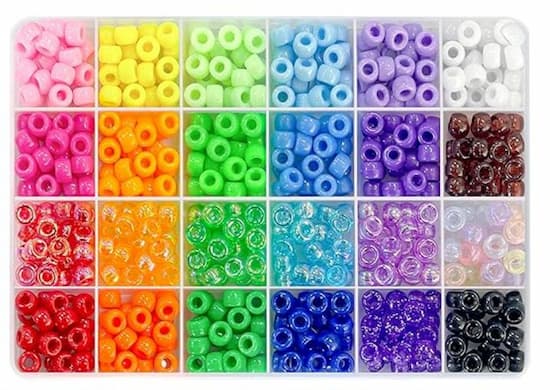
Pony bead bracelets are colorful, versatile accessories crafted from small, barrel-shaped beads, typically made of plastic or glass. These beads are threaded onto elastic cord or string to create intricate patterns, designs, and styles.
Pony beads come in a wide range of sizes, shapes, and colors, making them suitable for all projects and skill levels. By combining them into intricate pony bead bracelet patterns, you can craft beautiful, charming, and personalized pony bead bracelets that serve as both ornaments and means of self-expression.
Before diving into the detailed steps of crafting pony bead bracelets, let's explore some creative bracelet ideas with pony beads to inspire your crafting journey.
Rainbow Delight: Arrange pony beads in a vibrant rainbow spectrum to create a cheerful and colorful bracelet. Mix and match different shades to create an eye-catching pattern that brightens up any outfit.
Geometric Patterns: Experiment with geometric shapes such as squares, triangles, and diamonds to create bold and modern designs. Play with symmetry and asymmetry to add visual interest to your bracelet.
Nature-Inspired: Take inspiration from nature by incorporating floral, leaf, or animal motifs into your bracelet design. Use beads of different shapes and sizes to bring your favorite elements of the natural world to life.
Personalized Name Bracelet: Spell out your name or a meaningful word using alphabet beads to create a personalized bracelet that reflects your identity and personality.
These are just a few ideas to get you started, but the possibilities are endless when it comes to crafting pony bead bracelets. You can always experiment with different bead combinations and probably stumble upon patterns that vibe with you every now and then.
Embarking on your pony bead bracelet crafting journey requires a few key supplies to ensure smooth sailing from start to finish. Let's dive into the essentials:
Pony Beads: Pony beads come in a variety of colors, sizes, and finishes. Choose a selection that suits your style and vision for your bracelet.
String: Selecting the right string is crucial for creating durable and long-lasting pony bead bracelets. Elastic cords are typically favored for their flexibility and easy wearing.
Scissors: A trusty pair of scissors is essential for cutting your string to the desired length and for trimming any excess string once your bracelet is complete.
Ready to dive into the world of pony bead bracelet crafting? Follow this step-by-step guide to create your first stunning bracelet:
Start by wrapping the string around your wrist, ensuring a snug but comfortable fit. Mark the point where the strands meet using a pen or marker.
When cutting the string, it is recommended to leave some extra length (typically more than 6 inches) to accommodate for the beads and the knot. This means you’ll need to cut at some point more than 6 inches away from the mark.
Next, lay out the pony beads in front of you, arranging them in a line according to the pony bead bracelet designs or patterns you have in mind. Experiment with different plastic bead bracelet ideas until you find one that resonates with you. Once you're satisfied with your design, you're ready to move on to the next step.
Before stringing the beads onto the cord, it's essential to prestretch the string. Hold one end of the string firmly and gently tug on the other end a few times to stretch it out slightly. This can reduce the risk of the cord snapping when you string beads onto it.
With your string prepared and your beads laid out in your chosen design, it's time to start stringing! Hold the string firmly in one hand and begin threading the beads onto it using your other hand. Follow the order and arrangement of beads you determined earlier, sliding each bead onto the string one by one. Take your time to ensure each bead sits securely in place and that your design comes together just as you envisioned.
Once all the beads are strung onto the cord, it's time to secure them in place with a sturdy knot. Leave approximately 3 inches of string on both ends, giving yourself enough room to work with. Trim away any excess string beyond this point. Now, tie the ends of the string together using a surgeon's knot. This knot is easy to make and stronger compared to regular overhand knots, making it a popular choice for DIY bracelets.
With the knot securely tied, your bracelet is nearly complete. But there are still a few things you could to do make the finish more professional. For example, you’d probably want to trim away the excess cord coming out from the knot for a more refined finish. In addition, it is advised to apply jewelry glue to the knot to make it stronger and more secure. Once you're satisfied with the craftsmanship of your bracelet, it's time to proudly adorn your wrist with your handmade creation! (For more details, view the Pony Bead Bracelet-making Tutorial.)
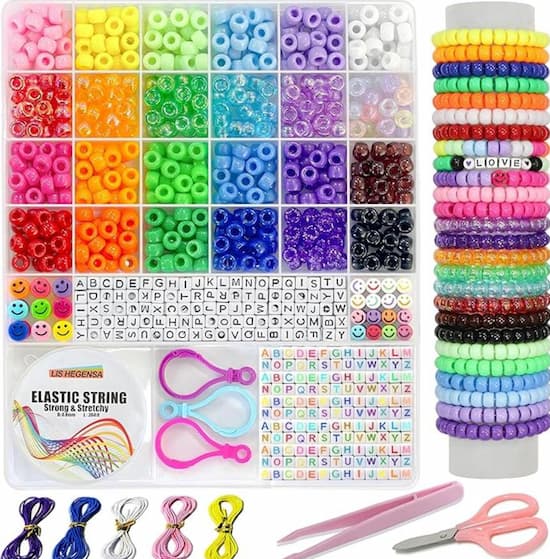
The process of crafting your DIY pony bead bracelet is incredibly easy, right? By following our pony bead bracelet ideas and our crafting instructions, as well as infusing your crafting process with a bit of personal flair, you can make a pony bead bracelet that tells your story and elevates your style to new heights. So why wait? Grab all materials or try the LIS HEGENSA Pony Beads Bracelet Making Kit and embark on your DIY journey today!
The number of pony beads needed to make one bracelet varies depending on the size of the beads, the desired length of the bracelet, and the chosen design. Generally, an average pony bead bracelet has 25 to 32 pony beads.
Yes. Pony bead bracelets are highly customizable. When crafting pony bead bracelets, you can choose from a wide range of bead colors, sizes, and finishes to create unique designs that reflect your individual style and personality.
No, seed beads and pony beads are not the same. Seed beads are small, uniformly shaped beads, often used in intricate beadwork and embroidery due to their size and versatility. Pony beads, on the other hand, are larger, cylindrical beads with a wider hole, making them easier to thread onto cords or strings.
Master how to make stretch bead bracelets with detailed instructions and versatile tips. Impress your peers with simple and stylish DIY stretch bead bracelets.
Read More
Learn how to make silver bracelets using techniques, tips, and inspiration to create stunning sterling silver bracelets from scratch.
Read More
Learn how to make a cowrie shell bracelet with step-by-step instructions and expert tips for crafting elegance with this timeless accessory.
Read More
Sleeper earrings are especially recommended for newbies. But have you ever asked why? In today’s topic, I’ll provide you the answer.
Read More